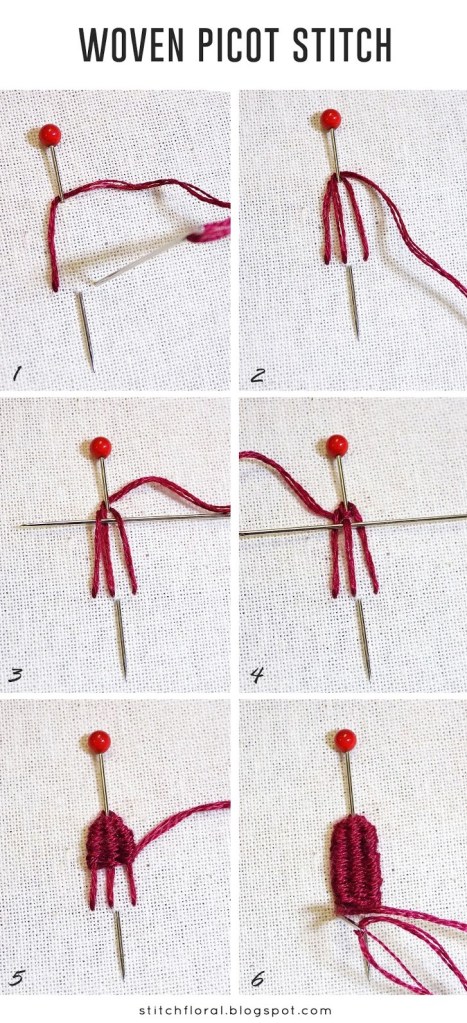
- To work this stitch you will need a sewing pin. Insert it in the fabric so that the bit of the fabric it picks up corresponds to the place and height of the future stitch. Then come up through the fabric at the starting point to the side of the pin. Pass the working thread behind the pin and end the stitch on the other side of the pin.
- Bring the needle up again, this time closer to the pin’s shaft, as close to the middle between the previous two points as possible. And pass the working thread behind the pin again.
- Now we start weaving motions. Slide the needle under the first string, over the second one, and under the third one.
- Next time, needle goes over-under-over. Keep changing the motions of weaving when you move from one side to the other.
- Make sure the horizontal rows of the interlacing are placed evenly with no gaps and holes.
- As you reach the bottom, finish your picot by inserting the needle back in the fabric.
To work this stitch you will need a sewing pin. Insert it in the fabric so that the bit of the fabric it picks up corresponds to the place and height of the future stitch. Then come up through the fabric at the starting point to the side of the pin. Pass the working thread behind the pin and end the stitch on the other side of the pin.
When your picot is complete, remove the pin. At first, your picot might be standing upright, but you can adjust it the way you want. You can even anchor it to the fabric, using the little loop that stays on top after the pin is taken out.
Reference / more information:
https://stitchfloral.blogspot.com/2018/11/how-to-make-realistic-petals-woven.html
